Today I’m going to take you on a tour of my Plum Paper Planner Large Teacher’s Planner (try saying that ten times fast!). In Part 1 we looked at how I use my A5 Filofax to organize the business aspect, and today, we´ll look at how I organize the actual teaching.
When I started teaching and for several years thereafter, I bought plain lined notebooks where I wrote down each class, what we were going to do, and any notes.


This was a perfectly fine system – but the major disadvantage was that I had to write in all the dates and times myself, ahead of time. It may seem silly, but it was a loss of productive time every week to sit down and write everything in, and whenever I needed to plan or write down something more than a week ahead of time, I didn’t have the dates prepared. So, searching online last year for solutions, I came across the Plum Paper Planner option. I bought it as a bit of an experiment, and so far, it’s working perfectly.


First of, a bit of a comparison: I was looking both at Erin Condren and Plum Paper Planner. My main decider was very simple – the EC Teacher’s Planner does not include lesson planning pages for the whole calendar year, only the school year. While that may be fine for some teachers, I teach all year round. I have a feeling I’m not the only person that would need to use a teacher planner all year round, so this was a major factor for me.
The PPP is divided by month.

With each month, you get pages for notes, a monthly calendar (Sunday start, the only bummer for me!), and then lesson planning pages for each week that falls within the month (even if only one day of the week is in that month). This leads to some repetition, but for me it’s quite helpful as I work on a monthly billing schedule and this way I can keep all my lesson plans for that billing cycle in the same section (for example, if one or two days of February are billed with March, I can include them in the March section). The lesson planning pages are divided into seven slots which you can choose to label or not at the time of purchase (I didn’t, as my schedule changes throughout the year). This was my first problem: I have nine teaching hours every day. I contacted them to see if it was possible to change the layout to include nine blocks instead of seven, but it wasn’t. So, I divide the blocks myself: with a ruler, I draw a line in the middle of each of the first three blocks to separate them.
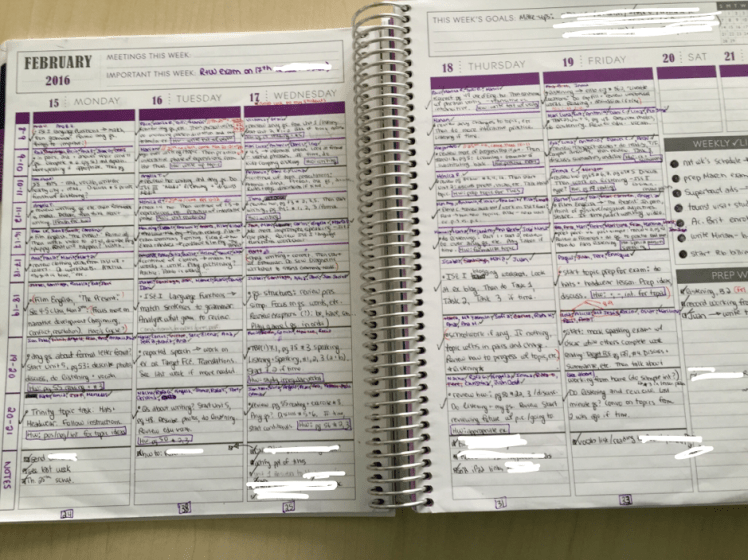
This leaves me with enough space to write the basics, and I can use the last block as a notes section to write down tasks that come up throughout the day (people I need to email, homework assignments to mail out, etc.). There are lots of sections that come with the planner apart from the months, and things you can add (more on that later). On the right, there are spaces to list weekly tasks and prep work. In the “Weekly List” section, I write things I have to do that week related to work, but with no particular deadline. In the “Prep Work” section I write materials I need to find or prepare for class, and next to each item I write down in red pen the day and time it must be ready for.
I was initially worried about the size of my blocks for lesson planning, but my writing is small and it´s actually forced me to think carefully about what I really need to write. In each block, I just write some notes to remind me – if we´re working from a textbook, the page and exercise numbers I want to work on. If we´re working from a self-designed lesson plan, the name of the lesson to find it quickly on my tablet, where I have them all stored. In the past, I also used to take notes of mistakes or things to work on next to the lesson. There´s no room for this here, so I´ve started using my tablet: I have a note set up for each class, and I take notes directly on the tablet. This has the added benefit of keeping all the mistakes and information on one class in the same place – I can quickly reference if we´ve gone over a particular mistake many times, or if it´s something new.

The other sections of this planner have proven fairly useful so far as well. For instance, I use the My Class section to write down the names and information of new students who are going to start. When they sign up, I write down all the relevant information here. When the student begins classes, I transfer this information to my digital client list, tick off the student, and note the start date. If a student signs up but can’t take classes in the end, I cross them out. It works well to have a record and see how many new students I have, how many have signed up and started, how many have signed up but not started, etc. I’ve also begun checking students off with different colors for the different months they start, so I have an at a glance record of who started when.
I also use the checklist section for noting down relevant checklists (I have a quick reference price sheet, info on contact and follow up with people interested in summer internships, etc.). In the notes section, I keep, well, notes. In the to-do section I actually have been keeping lists of important exam vocabulary and grammar topics – it makes for a good quick reference section. I thought I would use it for actual to-dos, but having it separated from my week and with all my other planner resources, I’ve opted not to.
All in all, I’m quite happy with the purchase. The planner is well constructed, though we’ll see if the cover manages to hold out for a full year! I’m a bit doubtful with the daily abuse I put it through…My main “problem” is that the planner is quite heavy – however, this is to be expected with the amount of paper in there, and the quality of the paper. I’m considering buying two planners for next year – one with January through June, and another from July through December.
As a side note, all my students love my planner and are constantly asking about it! I had one student tell me recently that she’s started to organize her school agenda in the same way as she sees me organize my classes, which made me quite happy. 🙂
Any questions, please let me know! Upcoming in part 3 – how I deal with photocopies and other random papers.

2 thoughts on “Planning my teaching (and business) – Part 2”